
I just had a blast the past couple days making a bunch of fabric postcards and thought I would share a little bit about my process. I almost always use scraps for my postcards and start by making a big block of fabric, which is later cut down to size.
So for this batch of postcards I wanted to use of a bunch of scraps called “orphan blocks.” For non-quilters, these are a sewn together quilt block that did not end up in a finished quilt. This happens for a number of reasons. Often there is a measurement mix-up so it is the wrong size to fit with the rest of the quilt. Or it might be a test block, which you make to test out the directions, color choices or measurements. I started sewing them together almost randomly, then occasionally slicing a row and sewing it on a different way. I continue this until I have used up all the scraps of the same color family or until it is about 20″ x 20″.

Next, I cut a plain backing the same size, usually a fabric I don’t like because it will be covered up in the end. I sandwich the top and bottom with either batting scraps in the middle or felt. I like using felt for my fiber collages because it makes a stiffer finished product. This is especially good when I am making bags and purses. Now I quilt. sometimes I will just use my regular sewing foot and do straight across lines or ziz-zags, but most often I am using a free-motion foot and doodling with the thread.
This time, after doing some quilting I decided to add some ribbons that I rediscovered in my recent studio clean up, especially since they were the same color family. I added some hand painted fabric to the sides to cover some extra batting and backing. Then I quilted and quilted. Once I decided I had covered enough of the surface with quilting, it was time to slice and dice.

Using my quilting ruler and rotary cutter I cut out 4 x 6 ” rectangles. But I couldn’t just do that in a linear fashion, I had to do them at random diagonals to get more interesting combinations of fabric and ribbons. Which leaves other pieces that just can NOT be tossed! I try to do this project as a “zero-waste” so don’t want to abandon any reusable scraps.

I call this step “Frankenstein-ing.” I zig-zag stitch these left over pieces together to make new chunks, which can then be cut into new 4 x 6″ pieces and on and on until the pieces are too small to work with anymore.

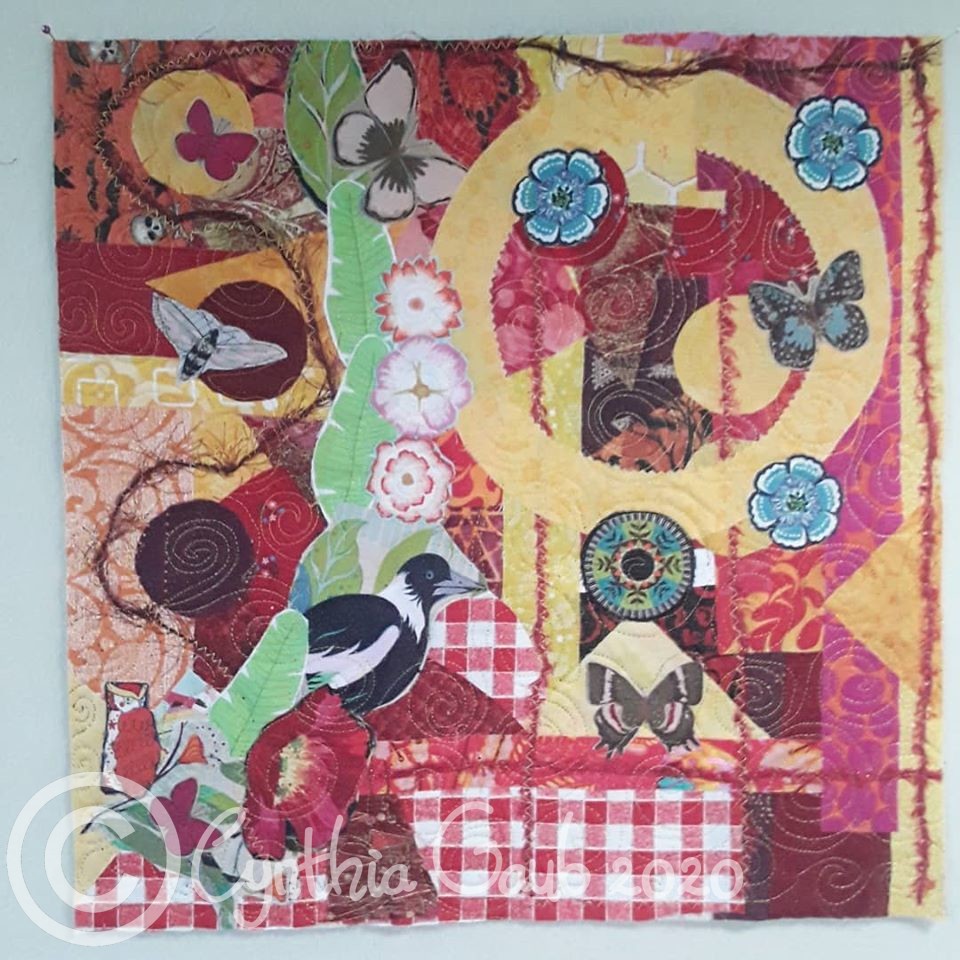
Now for the highlight fabrics. I have a bunch of fabrics with cool images that are already ironed on to “Steam-a-seam” double sided backing. (which I buy by the yard since I use a lot of it in my fabric collages.) These are ready to cut out and iron on to the postcard to give it a focal point. Things like little flowers, fish, leaves, birds or animals.

Final finishing includes sewing on the backing. After several tries with card stock, thin plastic for shipping envelopes, and card board… I have determined that tear off stabilizer is the best thing. This is a quilting/ machine embroidery product that is essentially a roll of sticker paper. While it is designed to tear off after you do an embroidery design, in this case I am leaving it on. It gives the postcard that last little bit of stiffness to make it thru the mail and a white paper surface to write on. I sew that on by satin stitching the entire edge of the postcard, sewing in the edges of the stabilizer. It also makes the satin stitching very smooth, unlike my previous methods.
One other method I have used is making a big collage of all my fun scraps and cool fabric iron-ons. Which I cover with tulle before quilting… but sometimes that ends up with a collage too cool to cut up.. like this one!
I hope you enjoyed this tutorial. Let me know if you try out any of these tips for your own fabric postcards.